Feeds:
Posts
Comments

Posts Tagged ‘Vegetarian’

Almond Crescents

I’m often tempted at the holidays to bake elaborately decorated or fancy cookies. And they undoubtedly have their charms.  But, sometimes, simpler is better.

Nothing could be more perfect in its unassuming splendor as these almond crescents. They look like nothing special, but then you bite in, and the cinnamon sugar yields to the tender butter crumb, and then that yields to the subtle flavor of ground almonds.  And then it’s gone, and you find yourself reaching for another, thinking, “well, that was so small, surely one more won’t hurt,” and before you know it you’ve polished off a dozen and wonder what happened.  A couple dozen of these, wrapped in red tissue paper makes a gorgeous gift for someone you really love.

Almond Crescents

Adapted from Rose’s Christmas Cookies

Makes about 3 dozen crescents

Ingredients:

Cookie dough:

2 ounces (about 2/3 cup) blanched slivered almonds

1/3 cup sugar

1 cup unsalted butter

1 2/3 cup all- purpose flour

Topping:

1/2 cup sugar

1/2 tsp ground cinnamon

Directions:

In a food processor fitted with a metal blade, grind the almonds and sugar together until the almonds are very fine. Add the butter a couple tablespoons at a time, with the motor still running, and process until smooth and creamy.  Add the flour and salt, and scrape the sides of the bowl.  Pulse the processor a few times, just until the flour is incorporated.

Scrape the dough into a bowl, and cover with plastic.  Refrigerate for two hours or until firm.

Preheat oven to 325 degrees F.

Roll a piece of dough into a ball less than an inch in diameter.  Roll it between your palms, until it is in the shape of a cylinder, with slightly tapered ends on both sides, about 3 inches long by 1/2 inch thick. Form each cookie into a crescent shape and place on an ungreased cookie sheet, about an inch apart.

Bake 14-16 minutes, or until set but not brown. Cool the cookies on the baking sheet for a few minutes, then transfer them while warm into a bowl of cinnamon sugar (see topping, above), turning gently to coat thoroughly, one at a time.

Keep in an airtight container for up to one month.

Read Full Post »

Gingerbread People

Certain cookies are iconic at this time of year, but they often don’t taste as good as they look.  Thankfully, these are the perfect gingerbread cookies — adorable, spicy, a tad chewy, and utterly delicious.  I make them every year, and people always say they are the best gingerbread cookies they’ve ever had.

Once again, my reputation as a baker rests on the shoulders of Rose Levy Berenbaum.  Her book, Rose’s Christmas Cookies, should be on the shelf of everyone who bakes cookies at the holidays.

Gingerbread People

adapted from Rose’s Christmas Cookies

Makes about 40 small or 25 large gingerbread people

Ingredients:

3 cups all-purpose flour

1/4 tsp salt

1 tsp baking soda

2 tsp ground ginger

1 tsp ground cinnamon

1/2 tsp grated nutmeg

1/4 tsp ground cloves

3/4 cup firmly packed brown sugar

12 Tbsp. unsalted butter, softened

1/2 cup Grandma’s molasses (unsulphured)

1 egg

Royal Icing, for decorating

Directions:

Mix together the flour, salt, baking soda and spices in a small bowl.  In a separate bowl, cream together the brown sugar and butter until fluffy (about 3-5 minutes using a stand mixer). Add the molasses and egg and beat until blended. On low speed, add the dry ingredients until well blended.

Scrape the dough out of the bowl and onto a sheet of plastic wrap.  Form into a flat-ish disc or rectangle. Wrap tightly and chill in the refrigerator for a couple of hours, or overnight, if necessary.

Preheat oven to 350 degrees F.

Roll out the dough on a lightly floured surface, to about 1/8 inch thickness or so.  If the dough is very cold, you may need to let it warm a bit on the counter before you begin to roll it out. Cut out the dough with cookie cutters in the shape of people, large or small.  Place the shapes on a piece of baking parchment or a lightly greased cookie sheet, leaving an inch or so between them.  Bake for 8-10 minutes for the small cookies, a couple minutes longer for the large ones.  Cookies will not color appreciably in baking, so look for them to rise a bit in the center, and be just starting to firm up.

Cool the cookies on the baking sheets for a few minutes, then transfer to wire cooling racks.  Decorate with royal icing (or melted white chocolate).

These cookies keep for months, stored in an airtight container, making them the perfect cookie to make early in your holiday season.

Read Full Post »

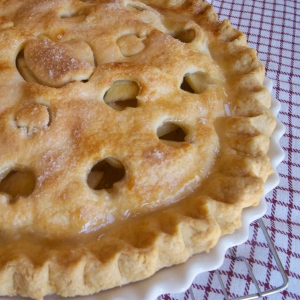
Now is the time for apples — crisp, juicy, glorious in their familiar, yet still sublime combination of sweet and tart. And what better way to celebrate them than baking a beautiful apple pie?

For this occasion, I chose a traditional double-crusted, deep dish apple pie. For this to work, the apples need to be flavorful and hold their shape while still being juicy, and the crust needs to be crisp and flaky.

Folks are often intimidated by making pie crust, these days. We’ve lost so much of our accumulated culinary knowledge in the home. We’ve forgotten what it means to be a good cook, and instead revere the celebrity chefs on our televisions. We have huge kitchens with cherry cabinets, stainless steel appliances and 6 burner stoves which too often are used just for heating up take-out food.

Pie crusts don’t require a degree from culinary school.  Generations of women (and it was mostly women) have rolled out pie crusts many times a week, without a recipe and in kitchens the size of my closet. Flaky pie crust is the result of adhering to a few guidelines, and then practicing enough so you get comfortable with the technique.

Keep your cool. Flaky crusts come from fats (butter, in this case) staying cold, and not coating the proteins in the flour. To keep that from happening, recipes often advise cooks to refrigerate their ingredients, even chill their bowls and utensils.  It’s best to make pie on a cool day, rather than in the heat of the summer.

Work quickly. This prevents the dough from warming up (see above) and prevents overworking the dough (see below).

Don’t overwork the dough. Gluten is a protein in wheat flour that creates long strands when stirred or kneaded.  This is wonderful when you are making pizza dough or baking bread, but it is anathema to tender pastry.

There’s not much more to it, honestly.  Details follow below. Don’t be intimidated, give it a try.

Double-crusted Apple Pie

Ingredients:

Filling:

8 apples,* peeled and sliced

Juice and zest of 1/2 lemon

1 tsp. vanilla extract

3/4 cup sugar

1/4 tsp. cinnamon

1/4 cup flour

Dash of freshly grated nutmeg

2 Tbsp. water

2 Tbsp. melted butter

* I suggest a mixture of apples, some tart and some sweet.  Choose varieties that hold their shape during baking. For this pie, I used Granny Smiths, Jonathans, and Golden Delicious. If you have access to an apple orchard or farmer’s market, you may find varieties not sold in normal supermarkets.  Ask the farmer about these — some heirloom varieties make the very best pies!

Crust:

14 Tbsp. (7 ounces) unsalted butter, cold

2 1/4 cup all-purpose flour

1/4 tsp. salt

1/4 tsp. baking powder

6 Tbsp. ice water

1 Tbsp. apple cider vinegar

Directions:

Cut the butter into little cubes (about 1/2″ ). Set aside approximately two-thirds of the butter, wrap loosely in plastic wrap, and put it in the refrigerator for at least a half hour. Wrap the remaining butter, and put it in the freezer. Combine the flour, salt and baking powder in a large Ziploc bag and put it in the freezer for about half an hour, as well.

Place the flour mixture in the food processor fitted with the metal blade and process for a few seconds to combine. Add the butter from the fridge (the larger portion) and pulse until the mixture resembles coarse meal, about 10-20 seconds. Add the remaining frozen butter cubes and pulse until the cubes are about the size of pease.

Add the ice water and vinegar and pulse five or six times. The dough will not “come together,” but you will be able to pinch it and have it hold together. Dump the crumbly mixture into a large Ziploc bag (you can use the same one from before). Close the bag, forcing any extra air out. Quickly knead the dough into a flat ball. Divide into two discs, and wrap each in plastic wrap. Refrigerate for 45 minutes or longer.

While the dough is chilling, prepare the filling.

Peel and slice the apples, tossing them with the lemon juice to discourage browning. Combine the remaining ingredients, except the butter.  Gently mix with the apples, tossing gently to coat.

Roll out one disc at a time, keeping the other cool in the refrigerator while you work.

On a lightly floured surface, or between two sheets of plastic wrap, if you prefer, roll out the first disc of dough to approximately 12″ in diameter.  Place the dough in the 9″ pie pan, and put it in the refrigerator while you roll out the upper crust to the same size.

Fill the bottom crust with the apples. Since the apples will shrink some in cooking, I find it best to take the time to layer the apples in the crust, leaving the least amount of space possible. The filling will be mounded over the height of the pan to some extent.  Do not worry about this, it is normal.

Drizzle the melted butter over the filling, and place the top crust over the whole thing. Fold the top crust edge over the bottom crust edge, and press together to make a ridge all the way around the pie. Crimp in any design you like. I usually make a zigzag by pushing the dough between my thumb and forefinger on my left hand, and the thumb of my right hand. But you can use a fork, or make any sort of design that encourages the two crusts to bond together and hold in the juices. Be creative.

Cut slits in the top to let steam escape. In the pie pictured above, I used a fancy device my Aunt Dusty gave me, that made a cute apple design. But you don’t need one to make a perfectly good-looking pie.

Brush the top with an egg white and sprinkle liberally with sugar.

Put the pie on a baking sheet, lined with foil to catch the inevitable drips and spills. Bake at 375 degrees for approximately one hour, or until the top is golden and the juices are bubbling.

Read Full Post »

Peach Salsa

Did you know that Colorado has some of the best peaches in the country?  Farmers on the Western Slope (around Palisades) do a remarkable job of growing these sweet beauties and driving them across the Continental Divide to farmers’ markets all along the Front Range. I can’t imagine how many acres of trees must be needed just to supply the hordes of shoppers in Boulder, alone.  People line up a half hour before the farmers’ market opens on Saturday mornings, just to be sure to get a bag or a 20 lb. box (I once saw someone buy four boxes!) before they sell out. They’re that good.

We are on the tail end of peach season here, but you can still find some stragglers at the market.  After you’ve had your fill of peach pie and peach cobbler, and you’ve had diced peaches on your morning cereal every day for a month, it’s time to branch out.  This salsa has that sweet heat that I find so perfect on grilled meats, or just scooped up with copious amounts of chips.  It would be awesome on fish tacos.

Remember, you can adjust the heat or the sweet by adding more or less of the following ingredients…

Peach Salsa

Ingredients:

3  cups  diced peeled peaches (about 2 pounds)

1/4  cup  diced red onion

1/2 red bell pepper, diced fine

2-4  Tbsp  finely chopped fresh cilantro

1 seeded jalapeño pepper, minced (or less, to taste)

2  tablespoons vinegar (rice vinegar or white balsamic or white wine vinegar make good choices)

Juice of half of a lime

Honey to taste

Directions:

Combine all ingredients gently.  Best served the day it is made.

Read Full Post »

Blueberry Cream Tart

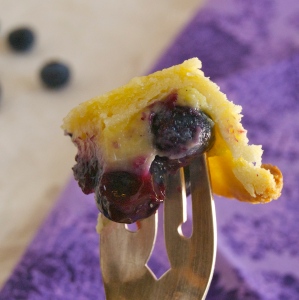
This recipe has a lot of steps, but the final result is worth the work. The crust is buttery and crisp, the pastry cream is, well… creamy, and the shiny blueberries on top are just bursting with freshness. It’s an elegant alternative to blueberry pie, which can often dissolve, with all the cooked blueberry juice, into a purple puddle (albeit a tasty one). This tart retains it’s integrity when sliced, as you can see from the picture.

Don’t you just want a bite?

Make it soon, while blueberries are still plentiful and cheap.

* — * — *

The first step is to make the crust and bake it completely. Fill the crust with a thin layer of pastry cream, and top with fresh blueberries, coated with a gorgeous shiny sweet glaze. The blueberries are not cooked. The hot glaze brings out a lovely purple color, while the berries retain their tart fresh flavor. The combination is incredible.

First, make the crust: I used the pate sucree from Rose Levy Berenbaum’s Pie and Pastry Bible. Use whatever crust you like. If you use store-bought, it won’t be as good, but life is full of trade-offs and I won’t tell.

Blind-bake the crust in a 9 inch tart pan, using pie weights or dried beans on parchment.  Take out the parchment and weights and bake until golden brown and crispy.  Set aside to cool.

Next, cook the pastry cream:

1 cup milk

1/2 vanilla bean, split lengthwise

3 large egg yolks

1/4 cup sugar

2 Tbsp. cornstarch

2 Tbsp. unsalted butter (cold)

zest from 1/4 orange (optional)

1/8 teaspoon freshly grated nutmeg

Bring the milk, 1/2 of the sugar, butter, salt and vanilla to a gentle boil in a medium saucepan.  Remove from heat.  Whisk together the cornstarch and remaining sugar. Add the egg and yolks to the cornstarch and mix into a smooth paste. Slowly add a little of the hot milk to the egg mixture, whisking constantly, to avoid curdling the eggs. Once the egg mixture is warm, add it to the milk in the pan.  Return the custard to the heat and boil for 2 to 3 minutes. Strain the pastry cream through a sieve into a heatproof container. Add the orange zest, if using, and the grated nutmeg. Set aside. If not using quickly, refrigerate. Keeps for a couple of days in the fridge.

Finally, make the blueberry topping

2 1/2 cups fresh blueberries

1/2 cup fruit juice (preferably a berry flavor)

2 tsp cornstarch, mixed with 2 tablespoons water.

1 tsp lemon juice

1/2 teaspoon lemon zest

Stir together the cornstarch and the water, mixing until dissolved. Add the fruit juice and lemon juice. Heat, stirring constantly, until the mixture comes to a boil. Cook for at least 30 seconds. It will thicken and clear. Remove from the heat and add the blueberries all at once, stirring gently to coat the berries evenly. The heat from the glaze will turn the berries bright blue, but will not cook the insides or cause the berries to burst.

Gently spoon the glazed berries evenly on top of the pastry cream, in the crust.  Cool completely.

Remove the tart from the pan and serve.

Read Full Post »

Larry and I recently celebrated our twelfth anniversary. One of the best things about being with him is the everyday, ordinary, sweet and loving things that make up our life together. These little gestures remind us of how grateful we are to have found one another, later in life.   For years, I pined away for love, and I doubt I’ll ever forget that loneliness, or take for granted the warm comfort of waking up next to him.

Long before we met, both my sweetie and I had the tradition of making waffles for Sunday morning breakfast. It was one of many signs that we belonged together, and we’ve continued enjoying “special breakfast” on Sundays ever since. Waffles still show up often in the rotation, and are our daughter’s absolute favorite.

This recipe has that lovely quality of seeming light and rich at the same time, a result of the sour cream and whipped egg whites, I suppose. No matter why, they’re delicious and sure to please the loved ones who are gathered at your table.

Sour Cream Waffles

adapted from Rose Levy Berenbaum

Makes about 12 “five of hearts” waffles.  You’ll get fewer from your Belgian waffle maker, but people will not eat as many.  This recipe feeds 4-6, depending on how much you love waffles.

Ingredients:

3 eggs, separated

1 tsp. vanilla extract

3/4 cup milk (I use 2%)

3/4 cup sour cream (light is fine)

2 tsp. baking powder

1/2 tsp. baking soda

1 1/2 cup flour

1/2 tsp. salt

1/2 cup unsalted butter, melted

Directions:

In a large bowl, beat the egg yolks until well blended.  Beat in milk, melted butter, vanilla, and sour cream.  Combine flour, salt and other dry ingredients.  Add to egg mixture and mix until just incorporated, being careful not to overwork the batter, which will toughen it.  Beat egg whites until stiff, and fold into batter.

Heat waffle iron and cook according to the manufacturer’s suggestion.  In my heart-shaped non-stick waffle iron, each waffle takes a heaping 1/3 cup of batter.

Cook until golden brown.  Serve immediately, with butter and maple syrup, or fruit and yogurt, or whatever strikes your fancy.

Read Full Post »

Have you discovered the charms of chard? A hearty green, with big shiny leaves, it’s a nutritional superstar with all sorts of vitamins and minerals. But I love it because it tastes great! To me, chard is like getting two complimentary vegetables in one — the leaves are tender and spinach-like, and the stalks are firmer, with a delicate flavor that reminds me of celery or fennel. Chard leaves have an slightly bitter flavor, which fades with cooking. The stalks are delicious in their own right, although they require a bit more time in the pan.

This elegant, rustic tart showcases the chard, accented with a few bits of sweet roasted red pepper and salty kalamata olives, and all bound together with tangy fresh goat cheese. Think of this as quiche where the vegetables took over.  It makes a beautiful summer meal.

Swiss Chard and Chevre Tart

Adapted from Tartlette

Ingredients:

Basic flaky pie crust (Use your favorite.  Here’s mine.)

1 bunch fresh swiss chard, washed and patted dry

2 Tbsp. olive oil

2 large shallots or one medium onion, diced

2 roasted red peppers (bottled is fine)

1/4 cup kalamata olives, pitted and roughly chopped

3 eggs, slightly beaten

1/2 cup milk

5-6 oz fresh goat cheese (chevre), crumbled

Salt and pepper

Pinch of freshly grated nutmeg

Directions:

Preheat oven to 350 degrees F.

Roll out crust and fit into 9 inch tart pan.  Place foil or parchment on entire bottom of crust, and up the sides. Fill with pie weights or rice or beans (these can be re-used for this purpose again and again). Bake 15 minutes. Take foil and pie weights out.  Continue baking another 5-10 minutes, or until the crust is lightly browned. Remove from oven.

While crust is baking, cut chard leaves away from stalks. Chop the leaves and slice the stalks. In a large sauté pan, cook the shallots or onions in the olive oil until tender (one minute for the shallots, longer for the onion). Add the stalks of the chard and continue cooking until barely tender, just a few minutes. Add the chard leaves and cook until the leaves have wilted and cooked through. Add the roasted red pepper and olives, and season with salt and pepper. Set aside.

In a food processor or blender, combine the eggs, milk, chevre and dash of nutmeg until smooth.

Spread the vegetable mixture in the crust, making sure it’s evenly distributed. It should look pretty full, but don’t worry. Gently pour the chevre mixture over the chard, until the crust is brimming. You might have extra filling, depending on how much room your chard took up. (You can bake the extra alongside the tart, in a little ramekin, and it’ll be a delicious little treat.)

Bake for 40 minutes, or until puffed and set in the center.  The top should be lightly browned.  Serve immediately with a crisp green salad and a glass of white wine, for a perfect “French bistro” dinner.

Read Full Post »

It’s hot.

The last thing I want to do is heat up the kitchen, or eat a big plate of steaming food.

At times like this, I know the perfect food — gazpacho! It’s cool and delicious and absolutely positively guilt-free.

Like anything, it’s best made with fresh-from-the-garden produce and herbs, but I often am in the mood for it before it’s harvest time for tomatoes and cucumbers here in Colorado. So, I will let you in on a little secret. You can make this any time of year, and it’s still really good. Not quite as amazing as it is when tomatoes are ripe and luscious, but how long does that last, anyway? You can enjoy gazpacho tonight!

white

Janet’s Pretty Good Gazpacho

Ingredients:

46 oz. tomato juice

2 lbs. or one large can crushed tomatoes

3 stalks celery, diced fine

1 1/2 bell pepper, diced fine

2 cucumbers, seeded and diced fine

1/2 cup chopped cilantro

Fresh basil and/or tarragon, chopped, to taste

1/4 cup minced red onion

3 Tbsp. olive oil

1/4 cup red wine vinegar

Salt and Pepper, to taste

Dash of ground cumin

Dash of cayenne or tabasco, if you like a little heat

Directions:

Combine all ingredients in very large bowl. Combine thoroughly. Ladle some of the soup into a blender and puree. How much? You decide. You can puree it all, if you want a smooth soup, but I prefer chunks of vegetables suspended in a soup with some body, so I puree about a third to a half of the soup. You could leave it unblended, if you like the dark red color and lots of chunks.

Chill thoroughly and serve.


Read Full Post »

Hippie Potato Salad

I call this Hippie Potato Salad, because I got the original recipe from the Moosewood Cookbook, a book that was found in many an earth mama’s kitchen way back when. People don’t often want to admit it, but hippies had a lot of good ideas, and it wasn’t just putting sprouts in salad. Natural foods groceries, supporting local organic farmers, solar and wind energy, recycling, environmental awareness, saving endangered species, herbal medicines and creative uses for hemp all were advocated 40 years ago by these kind folks.

I often wish that people today would give hippies their due. Would there be Whole Foods or even natural foods aisles at Safeway without their leadership?  Would kids be drinking soy milk or organic milk from happy cows in their waste-free lunch box systems, without those pioneers? Would Boulder require curbside pick up of food waste and turn it into compost if it weren’t for these visionaries? Let’s all say “thank you” to those aging hippies who introduced us to so many good ideas, even if the world wasn’t quite ready for them.  Nominate your favorite aging hippie or revolutionary idea in the comment section below.

In the meantime, have some great potato salad.

What makes this stand out is the incorporation of lots of vegetables, and the thinning out of the mayonnaise with apple cider vinegar.  The original recipe (called Kristina’s Potato Salad in Moosewood) suggests adding alfalfa sprouts and nuts and seeds, which would probably be good, too.  The idea is that you can be creative and add all sorts of healthy fresh foods to this creamy potato base, and it’s all good.

Potato Salad

Adapted from Moosewood Cookbook

Serves 8, generously

Ingredients:

6 cups red-skinned potatoes, skins and all, cut into chunks

1 cup cherry tomatoes, sliced in half

1 red bell pepper, diced

2 scallions, minced

1 large cucumber, seeded and diced

1 carrot, coarsely grated

2 stalks celery, diced

alfalfa sprouts (optional)

1/2 cup toasted cashews (optional)

1/4 cup toasted sunflower and sesame seeds (optional)

3/4 cup mayonnaise (I use light mayo to cut the fat)

1/2 cup cider vinegar

1 tsp. yellow mustard, dijon mustard or whatever mustard you have on hand

1 tsp. salt

fresh ground black pepper

fresh herbs:  parsley, chives, tarragon and basil are good, but use whatever strikes your fancy, as much or as little as you like

Directions:

Scrub and dice potatoes, and boil until just tender.  Drain and cool.  Put in large bowl and set aside.

Mix mayonnaise, mustard, cider vinegar, salt and pepper together until well blended.  Taste and correct seasonings. (It’s easier at this point than later.) Pour mixture over potatoes.  Add vegetables and herbs, and mix gently to coat.  Chill until ready to serve.

Read Full Post »

Jewish Apple Cake

I am fortunate to live near a great bakery. Breadworks is such a gem. They bake terrific artisianal breads that have crackly crusts and tangy sourdough flavor. Their display cases tempt me with a dizzying array of tarts and pastries, a dozen flavors of homemade gelato, in addition to flavorful, unusual soups and salads and hot entrees.

A while back, I fell in love with a coffeecake they bake, called Jewish Apple Cake.  It’s a sturdy, moist pound cake with a golden brown crust, studded with slices of apple.  And they give you an unbelievably large hunk of it for less than $3.  Still, as much as I loved it, I wished it had more apples.  And I wondered if I could find a recipe.  Since I’m not Jewish, I asssumed it was something that was passed down from your beloved Bubbe.  I went on a search.

And I learned some interesting things.  First, it’s not some sacred recipe, handed down from generation to generation. It seems to have originated in the 1950’s in the Baltimore/Philadelphia area. And it’s unclear why it’s called “Jewish.” Maybe it’s because it contains no dairy, so it’s pareve for meat or dairy meals. In any case, everyone who’s had it seems to rave about it.

It’s super easy to make, and not expensive (with oil instead of butter).  It is moist, chock full of apples, and keeps incredibly well, or so I hear.  It doesn’t last too long around our house, so we’ve not really pushed it to the limit.  But it sure is versatile! It works as an afternoon treat with coffee or tea, a homey dessert, or a great addition to breakfast or brunch.

Not sure what variety of apple to use? Check out this chart.

Jewish Apple Cake

Ingredients:

4 large or 6 small apples

1 tablespoon cinnamon

5 tablespoons sugar

2 3/4 cups flour, sifted

1 tablespoon baking powder

1 teaspoon salt

1 cup vegetable oil

2 cups sugar

1/3 cup orange juice

2 1/2 teaspoons vanilla

4 eggs

Directions:

Preheat oven to 350 degrees. Grease a tube pan. Peel, core and chop apples into chunks. Toss with cinnamon and sugar and set aside.

Stir together flour, baking powder and salt in a large mixing bowl. In a separate bowl, whisk together oil, orange juice, sugar and vanilla. Mix wet ingredients into the dry ones, then add eggs, one at a time. Scrape down the bowl to ensure all ingredients are incorporated.

Pour half of batter into prepared pan. Spread half of apples over it. Pour the remaining batter over the apples and arrange the remaining apples on top. Bake for about 1 1/2 hours, or until a tester comes out clean.

Let cake cool completely in the tube pan before inverting it onto a plate and then flipping it onto a cooling rack.

Read Full Post »

Older Posts »